
Two Detailed Ways of Dying Hair Replacement System: Factory & DIY
- How the Factory Professionally Dye Hair Systems
- How to Dye Hair Systems Yourself
When you bought a hair system, were you wondering which color to choose? Are you worried about the harm of dyeing in the factory? What should you do if you are not satisfied with the color of the hair system you receive? This article will tell you how the factory color the hair replacement system and teach you how to dye at home.
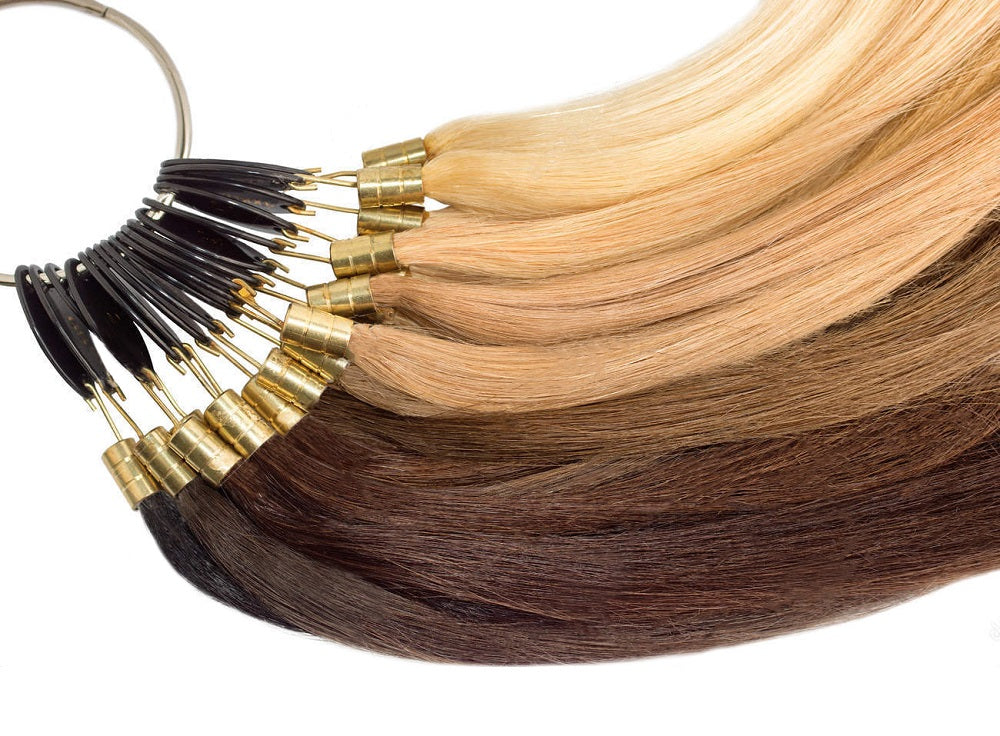
For the hair color to be treated, it first strips all the pigmentation and becomes translucent. Only when all the colors have been removed will the hair be dyed to our pre-defined color. We would first dye the wig a basic color, like two or four, just one color. We can also use percentages (for example, 40% #6, 50% #8, and 10% #60). Or we can use the highlighted color, which is basically one color as a “base color”, and then add the highlight at the top. Most of our stock colors are either single colors or single colors with a certain percentage of gray hair. Blended colors are usually for custom orders that take about six to eight weeks. Because natural hair comes in countless shades and colors, accurate color matching is not a simple matter.
Now let's introduce how the factory dyes the hair systems:
Hair dyeing requires 23 processes
Hair dyeing requires 23 processes: requisitioning materials, tie the arranged hair and shake messy hair, overacid, soaking water, first neutralization, coal dyeing, secondary neutralization, oxygen bleach, cleaning, spraying S7, dye, color matching, washing, fixing color, cargo inspection, oil soaking, soak the root of Remy hair, combing board, check goods, incoming drying, baking out, moisture return, check the goods into the distribution of 23 processes completed.
1Material Preparation
The requisitioning materials are requisitioned according to the quantity and style of the order; According to the hair quality, base color, amplitude, whether to choose the matching feeding, according to the hair quality to determine the raw material feeding which color should be appropriate.
2Hair Combing
Tie the arranged hair and shake messy hair refers to hair tied to row line, shake messy hair. Firstly tie the tail, leaving the tail 45 inches long, the head and tail must be distinguished. Then, shake messy hair, the process is to shake untidy hair completely below 12 inches except the Remy hair. The line is to arrange two lines along with the hair, white line on the head and line from the head.

3Process with Acid
Overacid is the process of removing the dirt, sundries and phosphorus sheets attached to the hair.
4Clean the acid
The soaking water is for foaming the overacid back in the water, reducing the acidity of the hair, making the hair acidic, the heterozygosity part is first removed in the clear water, and then neutralized.
51st Neutralization
The first neutralization is to put the hair after the acid is washed into ammonium water for neutralization, so as to dilute the acid and dirt on the hair and make the PH value of the hair reach neutral.
6Dye the color
The coal to dye is to directly oxygen bleach the hair with light color, which cannot be bleached to the required base color. The coal dye should be the first, and then it is beneficial to oxygen bleaching.

72nd Neutralization
And the secondary neutralization is to add the hair dyed by coal into the water with ammonia water for neutralization.
8Bleaching
Oxygen bleaching of hair is done by pouring hair into water with chemicals and bleaching it to the desired base color.
9Clean the Chemical residues
The cleaning process is to clean the chemical material on the hair.
10Spraying
The spraying S7 is to dilute S7 and water according to the dosage of 1:1, soak the hair in water for 25 minutes, drain the water slightly and put it into a constant greenhouse for 45 degrees for 45 minutes, clean, and then dye.

11Dye into different colors
The dye is mixed with water, auxiliary agent, dye according to different color and weight; Add hair at 700C (80°C) then boil to desired color.

12Matching the color
The color matching is to perform color matching on the part of the dyed hair that is blown dry. The color and color matching should be consistent, and the color matching should be performed after setting.
13Clean the dying material
The cleaning is to clean the dyed hair and wash away the color and impurities on the surface.
14Adding salt and glacial acetic acid
The fixing color refers to adding salt and glacial acetic acid to the hair after cleaning to fix the color and prevent the color from fading.
15Check
Check whether the washed goods are clean.
16Soaking in oil
The soaking oil is soaking in three-in-one liquid after washing the hair.

17Soak the root
Soak the root of Remy hair.
18Comb the hair-2nd time
The upper board of the carding cargo is to comb the hair, put on the drying board, and smooth it.
19Check again
Check whether the hair meets the requirements.

20Drying Again
The incoming drying is to put the combed hair into the drying room for drying; The oven temperature is 70°C -80°C.
21Baking bread?-- Baking to make it dry enough
The baking out refers to taking out the baked goods from the drying room.
22Get it moisture- not wet
The moisture return refers to the natural moisture return of the dried hair, humidity (7-8%).
23Check for the last time
The check goods into the distribution department is to return the good tide color hair, check the dry and wet degree, color feel after reaching the standard mating hair department.
How to Dye Hair Systems Yourself
Step 1: Prepare the Styrofoam Head
Step 2: Choose A Hair Dye for Your Hair System
Step 5: Wait for the Color to Take
Step 6: Rinse Your Hair Replacement System
Step 7: Dry Your Hair Replacement System
Have you ever run into the problem of your hair system taking on a slight orange shade for seemingly no reason at all? A lot of people have experienced this. This is common, and it can happen to your own natural hair too. Hairpiece oxidation is the main culprit for your hair system loses color over time. Oxidation is a chemical reaction that happens whenever your hair system is exposed to oxygen and ultraviolet rays which is also known as UV light. When these UV light rays make contact with the oxygen molecules on your hair system, it affects the color hues.
Exposure to the sun will slowly hurt your hair replacement system. It damages the outer layer of your hair system, which causes its original tone to become a duller, red color. For this reason it is recommended that you keep your hair replacement system out of the sun if you can — try using a hat, cap or scarf.
Making sure that your hair replacement system is clean and conditioned is also an important step to prevent oxidation and color loss . Using shampoos and conditioners that are specifically formulated for use with hair replacement system is essential for an effective hair system maintenance routine.
Has your hair replacement system already lost some of its color and you want to dye it in the comfort of your own home? Most people will turn to experts for assistance when it comes to coloring their hair replacement system. But the truth is, dying human hair replacement system is pretty straightforward. It is possible to use the same developer, hair dye, and tools like those you use for your own natural hair. All you need to do is mix the dye – apply it to the hair system – wash the hairpiece after you finish dyeing it to ensure it stays clean as well as being shiny. Here we have compiled a list of tips that will allow you to dye your hair system without needing an expert!
You Will Need:
| Aluminum gloves | A styrofoam model head |
| Toothed comb | Plastic Cup |
| Dry and clean towel | Hair dye |
| Gloves | Leave-in conditioner |
| Running tap water | Shampoo |
*Before your start: Make sure you are in a well-lit room, this will help you to judge the color more accurately, as well as ensure that you can see what you’re doing. Natural light is best. Wash the piece and allow it to air dry completely before starting the dyeing process.
Step 1: Prepare the Styrofoam Head
We recommend using a styrofoam head as it allows you to easily manage your hair replacement system. If using it, cover the styrofoam head with aluminum foil by molding it tightly which protects the hair system, and allows you to use it again the next time you want to color your hair.
Next, place the hair replacement system on the styrofoam head and make sure that it is properly secured. Then, brush or comb your hair system gently to remove any possible tangles.

Step 2: Choose A Hair Dye for Your Hair System
First and foremost, you have to pick up hair dye. There are no typical products for human hair replacement systems, so you can pick up a normal hair color which is available at the drug store and many other places in your area.
You can apply this method on how to dye a human hair system lighter or darker. However, we don’t recommend lightening the hair as you have to bleach the hair before dying which makes the hair system weaken.

Step 3: Mix the Dye
When coloring your hair replacement system, it's okay to use a color that is one or two shades lighter than your desired final result. This is because non-growing hair is more porous than growing hair, which causes it to take up color more easily. Selecting the right tone will get you closer to a match for your own hair color.
Once you choose the color, you can start to mix your dye, doing this in exactly the same way as you would use for dying your own natural hair.

Step 4: Apply the Dye
Make sure that you have your gloves on, this step is a messy one!
With your gloves now on, grab the comb and use it to work the dye into your hair system, start from the top of your hair system and work your way down. Take care to apply the dye to the hair only, not the base to which it is attached, otherwise it will cause an unwanted stain.

Step 5: Wait for the Color to Take
Now it's time for the dye to do its magic! You have to wait for a couple of minutes, with the exact amount of time-varying based on the type of dye you have chosen, so check the guidelines on the product before starting the process.
When you've checked that your dye is almost ready, (in accordance with the time stated on the guidelines!) you can start to do regular color check-ups. Squeeze the hair gently to remove some of the moisture to do this, remember that the dry color will be a shade lighter than the wet.
Step 6: Rinse Your Hair Replacement System
Once you have the desired color for your hair system, it's time to rinse it out. Gently remove it from the styrofoam head and rinse it with warm water. Rinse upside down so the color will flow through the base first to avoid getting any dye on it.
After you have rinsed your hair system, you can finish cleaning the hairpiece with a little bit of shampoo and washing once you're done.
Step 7: Dry Your Hair Replacement System
Now that we've rinsed our hair system, it's time to dry it! Use a soft towel or an old t-shirt to dry your hair system so as to avoid damage. Remember, do this slowly and smoothly, we don't want to cause any tangles!

Step 8: Final Touch
For best results we recommend that you use a leave-in conditioner. This will seal the color into your hair system and add moisture. After conditioning it, you can proceed to smoothly brush your hair — with a comb or brush that is safe for your hairpiece
That's the end of this hair system maintenance guide, with these 7 simple steps you won't have to depend on a pro to color your hairpiece! By following these tried and true tips, you will always get great results for your hairpiece.
